Wednesday, August 8, 2012

Winter project: redo basement

Our basement was less than exciting when we moved in.  I can't really tell you how to do it, hubby is multi-talented and seems to be able to figure out how to do almost anything.  I am so lucky and blessed that way!  But I did want to share some of our before and after pictures.  Just for fun!

We did everything ourselves, except enlisted my Dad to put the new french doors to the patio in and the drop ceiling was done by Jeremy's Uncle.

The cabinets were a craigslist special.  We were able to make them work for this space and had a beautiful glass one left over we hung in the laundry room as well as a whole work bench we put in my husband's hunting room!


Before: Future Kitchen Area


After Kitchen Area, eventually we would like to get a small fridge for under that cabinet
We did the tile here ourselves, hubby cut it I laid it and grouted it.  It's holding up good so far! This was our third
experience with tiling I think.  We chose Castle Stone Harvest from Lowes.


The next area was the living room area. We used the vinyl plank flooring in here. I love how easy to clean it is and has seemed to hold up very well so far to kids and pets and even some foster dogs. We had it all installed within about 3-4 hours.


The last area we wanted a table for games or extra eating space when we have company.  Maybe one day a pool table of course this is where Mr. Deerhead goes as well!


So that is what we spent all winter working on in our spare time.  Hubby did an amazing job figuring out the drywalling thing.  We went through a couple paint colors but like what we finally agreed on after me repainting it.


Canvas tutorial, personalizing our home

Make your own "canvas" tutorial

My canvas art going up the stairs


We have previously before this house moved 4 times in a 1 1/2 year period.  During this time every house we lived in had been for sale.  So I was used to the few family pictures set out on a table I could easily take down for showings.  I became accustomed to decorating without personalizing.  So as we had been here for almost 2 years I still had few family photos on the walls.  I also am not a huge fan of mismatched frames.  I went to hobby lobby to look for some frames for the stairway and even on sale at 50% they were going to cost me $11 a piece for the cheap ones.  That wasn't going to work for me.  So I got on pinterest to look up spacing and came accross a cool idea.

I picked up 3 foam boards (the extra thick ones, that's how they are labeled) at hobby lobby on sale 30% off (I have only used about 1 2/3 of them yet though), some spray adhesive (photo safe) and ordered some of my favorite family photos from CVS.  I had some dark brown spray paint lying around so I didn't have to buy any of that.  I laid my pictures on the board and traced with pencil.  Then removed the pictures and cut with a razor blade box cutter type knife.  I got pictures in three sizes 4x6, 5x7 and 8x10 to give it a little mix. 


Foam board pictured above


Then I took the boards outside and spray painted the sides and overlapped it to cut in a little on the tops in case it wasn't perfect on top no white would show through on the picture.  When the paint dried which didn't take very long thank goodness, I sprayed a mist of glue spray on the board and added my pictures.  This project only took me about an hour!!! (be careful not to overspray the glue)

Then one of the best parts is they are pretty light, so I used some mirror mounting double sided foamy tape to mount them up.  I hung a few up, stood back and then kept going.  Took a picture, rearranged a few and TA DA.....looks pretty cool!

I also picked up the W from Hobby Lobby for like $1.29 and spray painted it.

My 3 year old isn't used to so many pictures on the wall, we had taken them down when he was little and we were trying to sell our house.  He said there should only be 2 pictures on the wall! LOL he consistently cracks me up.  I love looking at all the fun memories on the wall each time I go up and down.  I saved some space for a hopeful Disney trip next year, one for our Hawaii trip this fall and also family portraits that we hope to get taken this fall by our favorite photographer, Shooting Stars Portraits!!! If you are local to Michigan, check them out!

What I really love even more is no nail holes in the wall and I can take them down and move them whenever!


A kind of side view of the sides of the "canvases" Excuse the hand rail on the carpet we have been working on the wainscoting up the stairs in the upstairs hall.  That project blog to come soon! :)


A close up of my new art! 
Restore Stain

Product Review: Restore Stain
http://www.synta.com/synta_store/index.php?p=catalog&parent=4&pg=1

So onto the deck.  We have appr. 625 square foot deck off the back of our house.  I stained it last summer.  Hubby never liked the color and commented on it often.  Not only the color but the boards were starting to warp slightly and crack. 


BEFORE


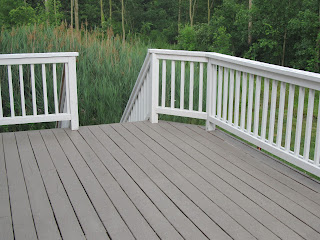
On one of our many trips to Home Depot we came accross this product.  There are displays all over here in the Home Depots.  They have the product at Lowe's too, but they don't seem to display it.  We were skeptical but did some research and decided to go for it.  Restore is more than a stain it is a thick covering.  It fills in all the cracks (up to 1/2") and gives it almost a trex decking feel and appearance.

While doing reviews we noticed that many people complained about the amount of time and patience it took to put the product on as it is pretty thick.  If you have ever worked with sanded grout, think rolling sanded grout onto your deck with this meshy plastic roller.  I went and purchased a better roller since ours was a cheapo dollar store one that wasn't cutting it.  Then since I am so used to working with paint I wanted to roll it too thin.  Hubby took over most of the rolling and I painted the base of the deck and the posts and cut in around the house.  I am not know for my patience.  It took us a little over a week working mostly at night since the 100 degree days were so hot here the top layer of the product was drying before we could roll it on good enough.


There are 2 looks the backbrushed smoot or the rough.  We tried both and opted for the rough look.  It was sticky for the first week or so as the product takes 21 days to fully cure. Now it is beautiful and we love it. Just make sure not to put it on if it is supposed to rain in the next 24 hours.

AFTER
We Chose the Winchester color as it complimented our tan siding without matching it too much.


Self improvement: my journey with my fitness pal

Self improvement

So as we have been working on our home and raising kids sometimes us Moms get pushed to the back of the list.  So lately I have been working on self improvement (diet and exercise)

I have to thank the makers of my fitness pal for this blog entry.  The other day I hit 100 days logging in. I also took a pole dancing 4 week class with my sister and my hubby and I have been doing Jillian Michaels 30 day shred 3-4 times a week.  This paired with eating healthier and getting in more exercise (bike rides and such) I blew my 14 lb weight loss goal away when I stepped on the scale this morning.  I am now down 15 1/2 lbs.  My long term goal now will be to keep it off and stay in shape (this will be the tougher goal!

BEFORE
For some reason I cannot figure out how to flip this picture but this is after and feeling GREAT!